

Managing projects in Jira can become cumbersome, especially when handling large volumes of issues. Automation can revolutionize this process, saving time and minimizing errors. Whether you’re managing a technology rollout, a healthcare transformation, or construction project tasks, automating Jira issue creation is crucial for enhancing efficiency. This guide will walk you through several methods to achieve this, including using Jira’s built-in automation rules, bulk creation through CSV files, and leveraging tools like Power Automate. Follow along to learn how to ease your project management burden and enable your team to focus on what they do best.
Streamlining Jira Issue Creation with Automation Rules
One effective yet underutilized method to automate tasks in Jira is through Automation Rules . Located within Jira’s toolkit, these rules can automate repetitive tasks, saving significant time. You can establish rules that automatically create, modify, or assign issues based on trigger events such as status changes, specific field updates, or time intervals. For example, automatically generating a weekly report issue can ensure that it never slips through the cracks, thus maintaining consistent workflow and accountability.
Automation rules are highly customizable, allowing you to tailor them to fit your specific project needs. To create an automation rule, navigate to Project Settings or Global Administration , and select Automation . From here, you can choose a blank automation, select a trigger, and define the actions to perform. With capabilities to notify stakeholders, clone issues, or link them, automation streamlines tedious manual processes and upscales your team’s productivity manifold.
Bulk Issue Creation Using CSV Files
For project managers handling large datasets, the CSV bulk upload option is a godsend. This method involves preparing a CSV file with all the necessary issue details, such as summary, description, type, and priority, which Jira can import and convert into issues seamlessly. For example, if you’re launching a product and have 200 user stories ready, this method will create the corresponding Jira issues in minutes. It’s essential to ensure your CSV follows the correct format and includes the necessary fields for a smooth import process.
Begin by exporting any sample issue data from Jira to understand the structure of the CSV. After organizing your data, go to the Jira Import Wizard and select Import Issues from CSV . Follow the steps, map the fields correctly, and in no time, you will possess a robust list of issues ready for action. Bulk importing is especially useful when adopting Jira for the first time or syncing data from other project management tools into Jira.
Requirements
Before getting started with automating Jira issue creation, you need a few essential requirements . First, ensure you have the appropriate permissions in Jira. This includes having administrative access to create automation rules and administrative permissions to import data through CSV files. Without the right access, your automation journey might hit unnecessary roadblocks.
Secondly, a fundamental requirement is knowledge of Jira’s functionalities and some web service technology understanding, especially if you plan to use the Jira API for automation tasks. Being well-versed in these areas assures not only the smooth execution of automation but also aids in troubleshooting and optimizing processes.
Obtain a Jira API Token
For those looking to explore advanced automation using scripts or integrating third-party applications, obtaining a Jira API Token is necessary. This token acts as a secure key that allows your scripts or applications to interact with Jira. To create one, log into your Atlassian account, navigate to the API tokens section, and generate a new token. It’s crucial to store this token in a secure place as it grants significant access to your Jira instance.
Using the API, you can automate complex tasks such as creating detailed reports, syncing Jira with other applications, or performing actions conditional on multiple criteria. With a well-defined API token, your automation can transcend basic tasks, driving heightened integration and efficiency within your project spaces.
Develop a Power Automate Workflow
One of the most flexible ways to automate Jira issue creation is by employing Power Automate . As part of Microsoft’s Power Platform, Power Automate allows users to create detailed workflows that connect Jira with numerous other services and applications. Start by identifying trigger conditions, such as receiving an email or a file deposit in a cloud service, that will kickstart the process.
Within Power Automate, configure actions that send HTTP requests to your Jira API with the issue details embedded, creating Jira issues in real time. Power Automate excels in being both versatile and user-friendly, offering capabilities to send notifications or gather data simultaneously—elevating your Jira automation to a whole new level. Furthermore, Power Automate’s extensive library of templates and connectors can drastically reduce development time, ensuring swift deployment and integration.
| Key Points | Summary |
| Automation Rules | Automates repetitive tasks within Jira, triggered by various events. |
| CSV Bulk Upload | Allows for efficient batch creation of issues using a CSV file. |
| Requirements | Ensure proper permissions and understanding of Jira API for advanced tasks. |
| Jira API Token | Necessary for advanced integrations and automations via scripts. |
| Power Automate Workflow | Provides flexibility to create workflows connecting Jira with other services. |
FAQ
How do I automatically Create issues in Jira?
To automatically create issues in Jira, you can use one of the following methods:
- Jira Automation Rules: – Navigate to the “Project Settings” in your Jira project. – Select “Automation” from the menu. – Click on “Create rule” to start building your automation rule. – Set a trigger for your rule, such as when a new event occurs or at scheduled times. – Add an “Action” to create a new issue, specifying the project, issue type, and details. – Save and enable your rule.
- Jira REST API: – Use Jira’s REST API to programmatically create issues. – Make a POST request to the URL https://your-domain.atlassian.net/rest/api/3/issue. – Include authentication headers and a JSON payload with the issue details, such as project ID, summary, issue type, and any custom fields.
- Third-party Integrations: – Use integrations like Zapier or Automate.io to connect Jira with other apps. – Set up a trigger in another app (like a form submission or email) to create an issue in Jira.
- Scripts and Add-ons: – Use scripts or Jira plugins/add-ons from the Atlassian Marketplace for more complex automation tasks.Choose the method that best fits your needs and technical skill level.
How to automate task creation in Jira?
Automating task creation in Jira can be done using a few different methods. Here’s a simple guide:
- Project Automation Rules: – Navigate to your project and go to Project Settings. – Select Automation from the sidebar. – Click on Create rule. – Choose a trigger for your rule, like “Issue Created” or based on a time schedule. – Define the action to create a new task. You can set this to create a task with specific fields or attributes filled in. – Save and enable the rule. Jira will now automatically create tasks based on the conditions you’ve set.
- Using Templates: – If you frequently create similar tasks, consider using a task as a template. – Copy existing tasks and modify necessary fields quickly.
- Third-party Integrations: – Use integrations available on the Atlassian Marketplace like Zapier or Automate.io. – Set up triggers and actions between Jira and other tools (e.g., Slack message triggers a new Jira task).
- REST API: – If you’re comfortable with coding, use Jira’s REST API to script task creation. – Write a script that sends a POST request to the Jira API endpoint to create a new issue/task whenever the conditions you specify are met.
- Webhook Triggers: – Set up webhooks that listen to specific Jira events and trigger task creation through an external service or script.Choose the method that best suits your team’s needs and technical expertise.
Can Jira be automated?
Yes, Jira can be automated. You can use tools like Jira Automation, which allows you to create rules to automate repetitive tasks and processes without needing to write code. Additionally, you can use Jira’s REST API for more advanced automation or integrate Jira with other automation tools like Zapier and Power Automate.
How do I Create an incident in Jira automation?
Creating an incident in Jira using automation involves setting up an automation rule to automatically create an issue when certain conditions are met. Here’s a simple way to do it:
- Navigate to Automation: – Go to your Jira project and find the “Project settings” in the sidebar. – Find and click on “Automation” or “Project Automation” under project settings.
- Create a New Rule: – Click on “Create rule” to start setting up your automation.
- Set a Trigger: – Choose a trigger for your rule depending on when you want the incident to be created. This could be something like “Issue Created,” “Field Value Changed,” or schedule-based with “Scheduled.”
- Add Conditions (Optional): – You can add conditions to refine when the incident should be created. For example, only create an incident if the priority is high.
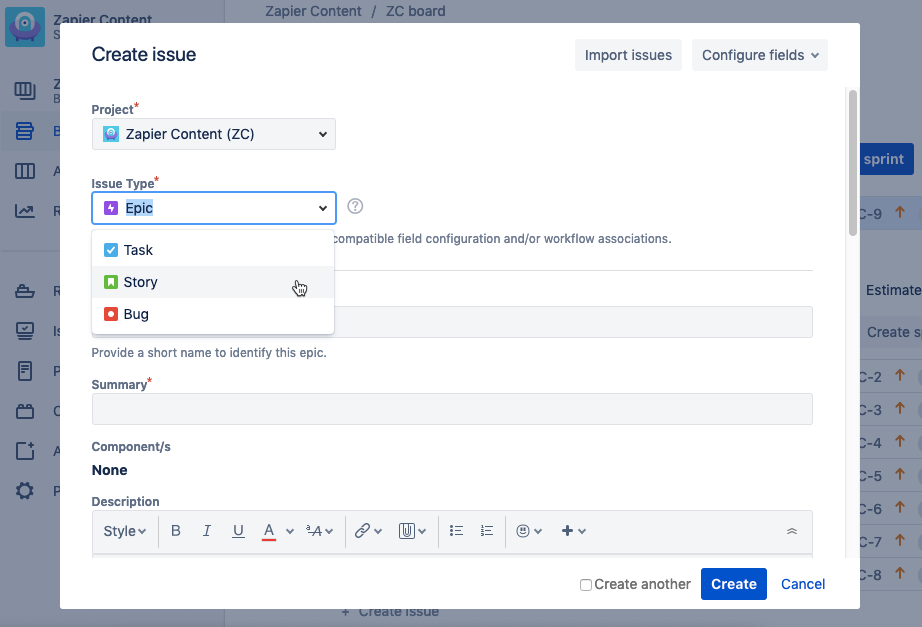
- Add an Action: – Choose “Create issue” as the action to automatically create an incident. – Configure the issues by setting details like the project, issue type (set it to “Incident”), summary, description, and any other relevant fields.
- Test the Rule: – Use the “Audit Log” to see if your rule runs as expected. Check that incidents are created correctly when the conditions are met.
- Turn on the Rule: – Once you’ve confirmed everything works through testing, enable the rule to start automatically creating incidents.
- Save the Rule: – Save your rule and give it a meaningful name so you can easily find or edit it later.
With this setup, Jira will automatically create an incident based on the criteria and trigger you have defined.